

Create a simple serverless web application that enables users to request rides from a fleet


Overview
Create a simple serverless web application that enables users to request unicorn rides from the Wild Rydes fleet. The application will present users with an HTML-based user interface for indicating the location where they would like to be picked up and will interact with a RESTful web service on the backend to submit the request and dispatch a nearby unicorn. The application will also provide facilities for users to register with the service and log in before requesting rides. All of the files can be found here.
Prerequisites
To complete this tutorial, you will need an AWS account, an account with ArcGIS to add mapping to your app, a text editor, and a web browser.
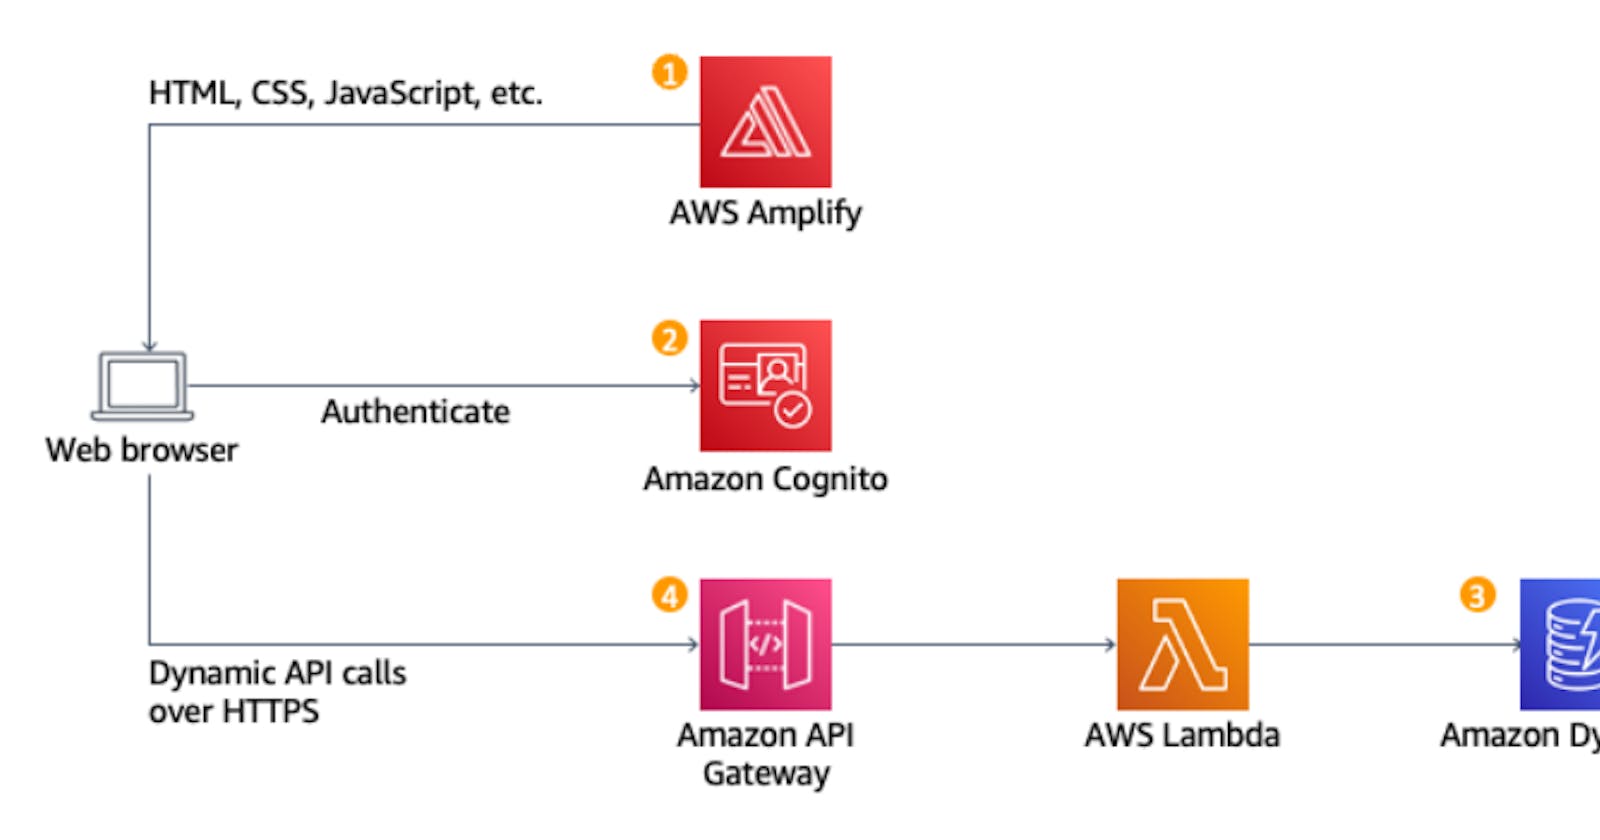
Application Architecture
The application architecture uses AWS Lambda, Amazon API Gateway, Amazon DynamoDB, Amazon Cognito, and AWS Amplify Console. Amplify Console provides continuous deployment and hosting of static web resources including HTML, CSS, JavaScript, and image files which are loaded in the user's browser. JavaScript executed in the browser sends and receives data from a public backend API built using Lambda and API Gateway. Amazon Cognito provides user management and authentication functions to secure the backend API. Finally, DynamoDB provides a persistence layer where data can be stored by the API's Lambda function.
Static Web Hosting
AWS Amplify hosts static web resources including HTML, CSS, JavaScript, and image files which are loaded in the user's browser.
User Management
Amazon Cognito provides user management and authentication functions to secure the backend API.
Serverless Backend
Amazon DynamoDB provides a persistence layer where data can be stored by the API's Lambda function.
RESTful API
JavaScript executed in the browser sends and receives data from a public backend API built using Lambda and API Gateway.
Modules
This tutorial is divided into five modules. Each module describes a scenario of what we're going to build and step-by-step directions to help you implement the architecture and verify your work.
Host a Static Website: Configure AWS Amplify to host the static resources for your web application with continuous deployment built-in
Manage Users: Create an Amazon Cognito user pool to manage your users' accounts
Build a Serverless Backend: Build a backend process for handling requests for your web application
Deploy a RESTful API: Use Amazon API Gateway to expose the Lambda function you built in the previous module as a RESTful API
Terminate Resources: Terminate all the resources you created throughout this tutorial
Static Web Hosting with Continuous Deployment
In this module, we will configure AWS Amplify to host the static resources for our web application with continuous deployment built-in. The Amplify Console provides a git-based workflow for continuous deployment and hosting of full-stack web apps. In subsequent modules, we will add dynamic functionality to these pages using JavaScript to call remote RESTful APIs built with AWS Lambda and Amazon API Gateway. The architecture for this module is straightforward. All of our static web content including HTML, CSS, JavaScript, images, and other files will be managed by AWS Amplify Console. Our end users will then access your site using the public website URL exposed by AWS Amplify Console. We don't need to run any web servers or use other services to make our site available. For most real applications we'll want to use a custom domain to host our site.
Implementation
Select a region
Create a Git repository
Populate the Git repository
Change directory into your repository and copy the static files from S3:
aws s3 cp s3://wildrydes-us-east-1/WebApplication/1_StaticWebHosting/website ./ --recursive
Commit the files to your Git service
git add .
git commit -m 'new'
git push
Enable Web Hosting with the AWS Amplify Console
Next, we'll use the AWS Amplify Console to deploy the website we've just committed to git. The Amplify Console takes care of the work of setting up a place to store your static web application code and provides several helpful capabilities to simplify both the lifecycle of that application as well as enable best practices.
a. Launch the Amplify Console console page
b. Click Get Started under Deploy with Amplify Console
c. Go to New App on the top right and choose Host Web App
d. Select CodeCommit under Get started with Amplify Hosting
e. Select the Repository service provider used today and select Continue
f. If you used GitHub, you'll need to authorize AWS Amplify to your GitHub account
g. From the dropdown, select the Repository and Branch you just created and select Next
h. On the Configure build settings page, leave all the defaults, Select Allow AWS Amplify to automatically deploy all files hosted in your project root directory and select Next.
i. On the "Review" page select Save and deploy
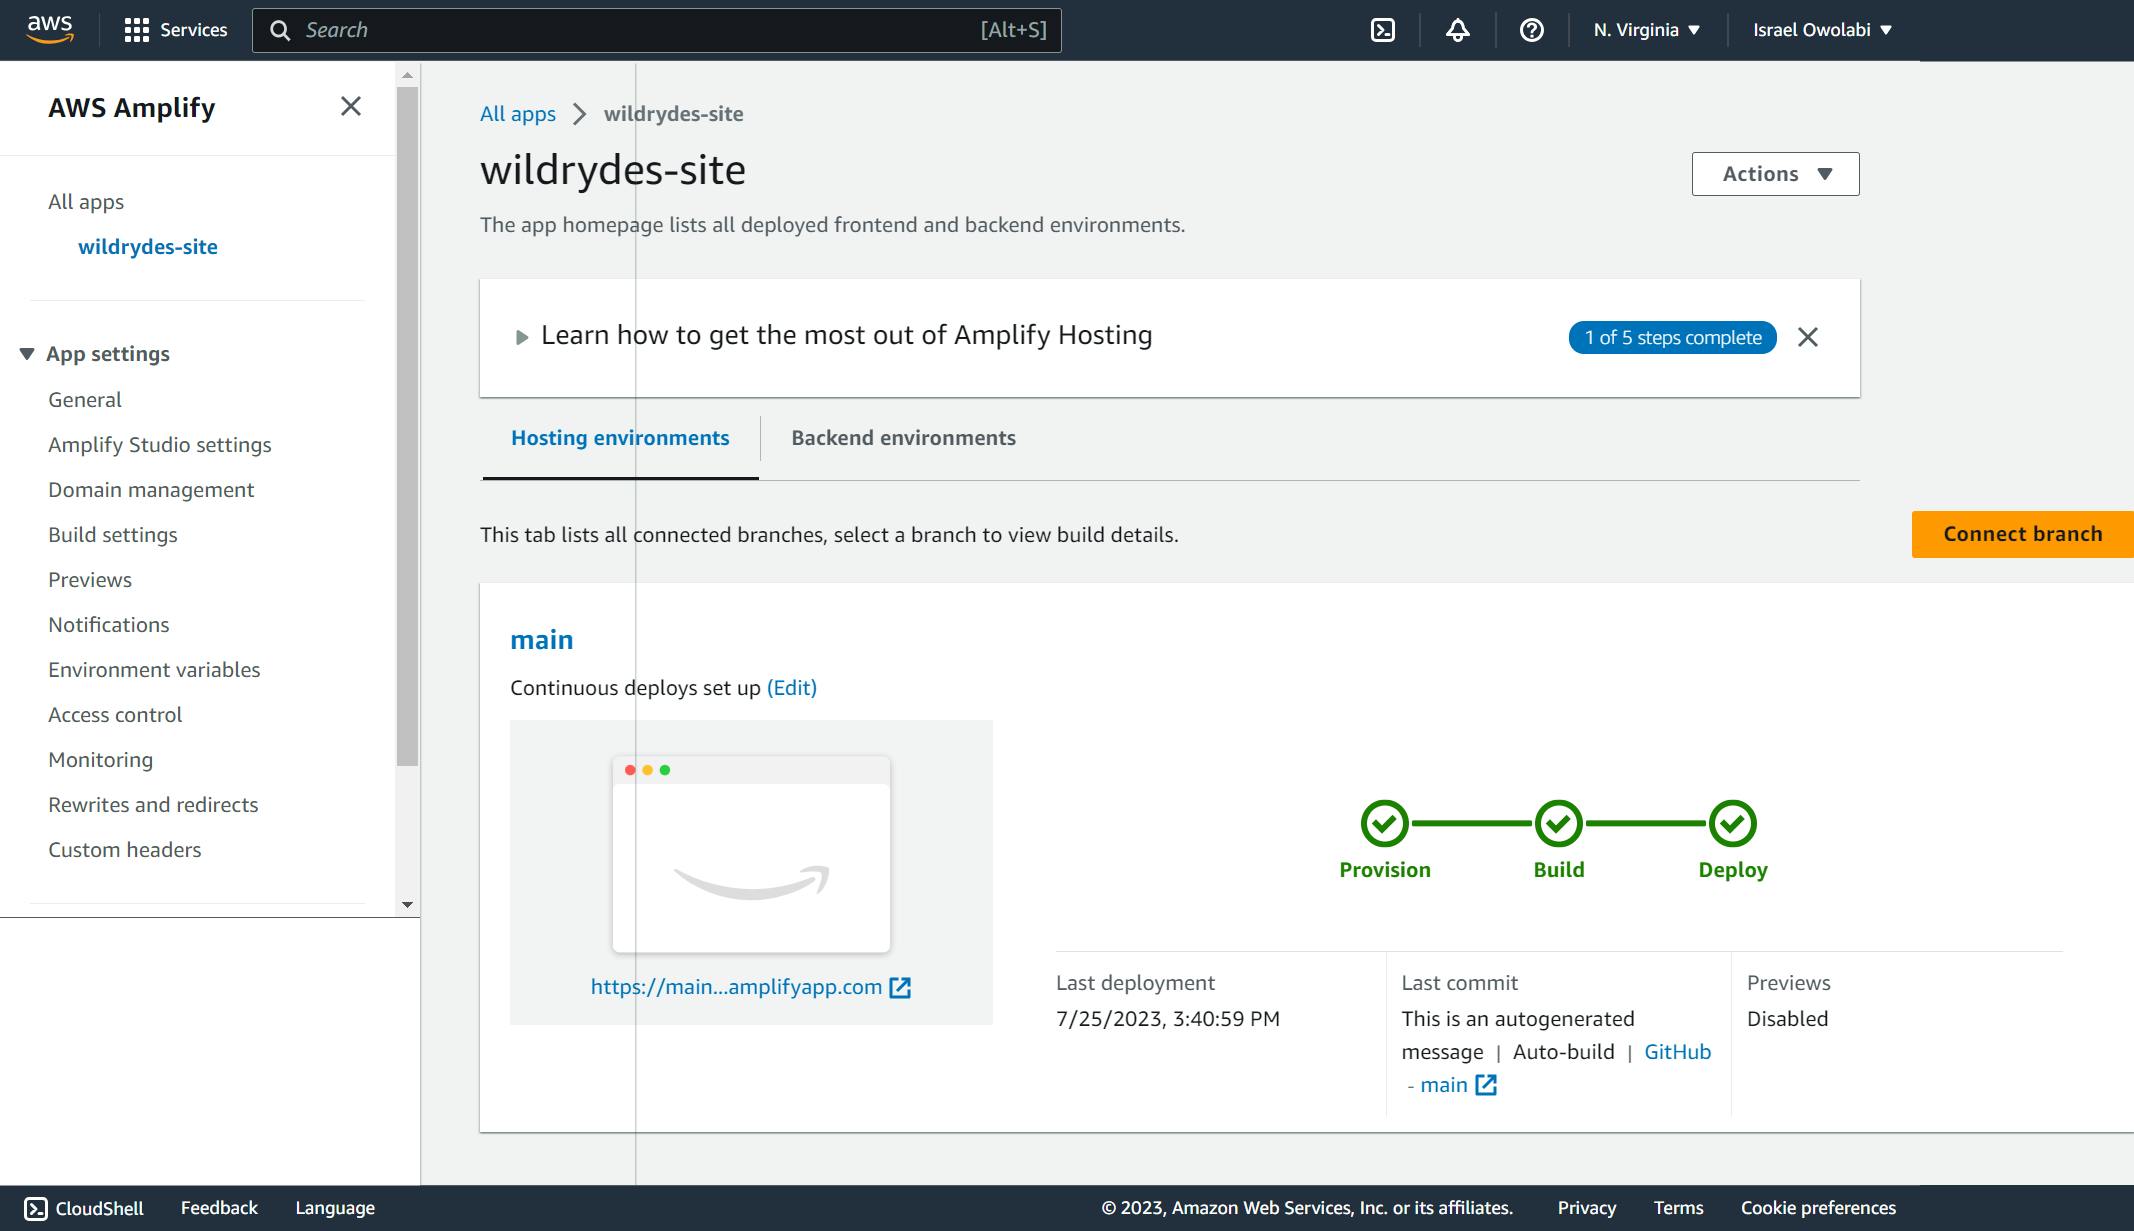
j. The process takes a couple of minutes for Amplify Console to create the necessary resources and to deploy your code.
Once completed, click on the site image to launch your Wild Rydes site. If you click on the link for Master you'll see the build and deployment details related to your branch, and screenshots of the app on various devices

Modifying our site
The AWS Amplify Console will rebuild and redeploy the app when it detects changes to the connected repository. Make a change to the main page to test out this process.
a. From your local machine, open wildryde-site/index.html in a text editor of your choice and modify the title line so that it says: <title>Wild Rydes - Rydes of the Future!</title>
b. Save the file and commit to your git repository again. Amplify Console will begin to build the site again soon after it notices the update to the repository. It will happen pretty quickly! Head back to the Amplify Console page to watch the process.
git add index.html
git commit -m "updated title"
git push

Recap
In this module, we've created a static website which will be the base for our Wild Rydes business. AWS Amplify Console makes it easy to deploy static websites following a continuous integration and delivery model. It has capabilities for "building" more complicated Javascript framework-based applications and has features such as feature branch deployments, easy custom domain setup, instant deployments, and password protection.
User Management
In this module, we'll create an Amazon Cognito user pool to manage your users' accounts. We'll deploy pages that enable customers to register as new users, verify their email addresses, and sign into the site.
When users visit our website they will first register a new user account. For this workshop, we'll only require them to provide an email address and password to register. However, you can configure Amazon Cognito to require additional attributes in your applications.
After users submit their registration, Amazon Cognito will send a confirmation email with a verification code to the address they provided. To confirm their account, users will return to our site and enter their email address and the verification code they received. You can also confirm user accounts using the Amazon Cognito console with a fake email address for testing.
After users have a confirmed account (either using the email verification process or a manual confirmation through the console), they will be able to sign in. When users sign in, they enter their username (or email) and password. A JavaScript function then communicates with Amazon Cognito, authenticates using the Secure Remote Password protocol (SRP), and receives back a set of JSON Web Tokens (JWT). The JWTs contain claims about the identity of the user and will be used in the next module to authenticate against the RESTful API we build with Amazon API Gateway.
Implementation
Create an Amazon Cognito User Pool and Integrate an App to Our User Pool
Amazon Cognito provides two different mechanisms for authenticating users. You can use Cognito User Pools to add sign-up and sign-in functionality to your application or use Cognito Identity Pools to authenticate users through social identity providers such as Facebook, Twitter, or Amazon, with SAML identity solutions, or by using your identity system. For this module, we'll use a user pool as the backend for the provided registration and sign-in pages.
a. In the AWS Console, enter Cognito in the search bar and select Cognito from the search results.
b. Choose Create user pool.
c. On the Configure sign-in experience page, in the Cognito user pool sign-in options section, select User name. Keep the defaults for the other settings, such as Provider types in the Authentication providers section. Choose Next.
d. On the Configure security requirements page, keep the Password policy mode as Cognito defaults. You can choose to configure multi-factor authentication (MFA) or choose No MFA and keep other configurations as default. Choose Next.
e. On the Configure sign-up experience page, keep everything as default. Choose Next.
f. On the Configure message delivery page, for Email provider, confirm that Send email with Amazon SES - Recommended is selected. In the FROM email address field, select an email address that you have verified with Amazon SES, following these instructions from the Amazon SES Developer Guide.
g. On the Integrate your app page, provide a name for your user pool such as WildRydes. Under Initial app client, give the app client a name such as WildRydesWebApp and keep other settings as default.
h. On the Review and create page, choose Create user pool.
i. Note the Pool ID and the App client ID on the Pool details page of your newly created user pool.
Update the Website Config
The /js/config.js file contains settings for the user pool ID, app client ID and Region. Update this file with the settings from the user pool and app you created in the previous steps and upload the file back to your bucket
a. From your local machine, open wildryde-site/js/config.js in a text editor of your choice.
b. Update the cognito section with the correct values for the user pool and app you just created.
You can find the value for userPoolId on the Pool details page of the Amazon Cognito console after you select the user pool that you created.
You can find the value for userPoolClientId by selecting App clients from the left navigation bar. Use the value from the App client id field for the app you created in the previous section.
The value for region should be the AWS Region code where you created your user pool. E.g. us-east-1 for the N. Virginia Region, or us-west-2 for the Oregon Region. If you're not sure which code to use, you can look at the Pool ARN value on the Pool details page. The Region code is the part of the ARN immediately after arn:aws:cognito-idp:.
The updated config.js file should look like this. Note that the actual values for your file will be different:
window._config = {
    cognito: {
        userPoolId: 'us-west-2_uXboG5pAb', // e.g. us-east-2_uXboG5pAb
        userPoolClientId: '25ddkmj4v6hfsfvruhpfi7n4hv', // e.g. 25ddkmj4v6hfsfvruhpfi7n4hv
        region: 'us-west-2' // e.g. us-east-2
    },
    api: {
        invokeUrl: '' // e.g. https://rc7nyt4tql.execute-api.us-west-2.amazonaws.com/prod',
    }
};
d. Save the modified file and push it to your Git repository to have it automatically deploy to Amplify Console.
```plaintext
git add .
git commit -m "new_config"
git push
Validate your implementation
a. Visit /register.html under your website domain, or choose the Giddy Up! button on the homepage of your site.
b. Complete the registration form and choose Let's Ryde. You can use your own email or enter a fake email. Make sure to choose a password that contains at least one upper-case letter, a number, and a special character. Don't forget the password you entered for later. You should see an alert that confirms that your user has been created.
c. Confirm your new user using one of the two following methods.
d. If you used an email address you control, you can complete the account verification process by visiting /verify.html under your website domain and entering the verification code that is emailed to you. Please note, the verification email may end up in your spam folder. For real deployments we recommend configuring your user pool to use Amazon Simple Email Service to send emails from a domain you own.
e. If you used a dummy email address, you must confirm the user manually through the Cognito console.
f. From the AWS console, click Services then select Cognito under Security, Identity & Compliance.
g. Choose Manage your User Pools
h. Select the WildRydes user pool and click Users and groups in the left navigation bar.
i. You should see a user corresponding to the email address that you submitted through the registration page. Choose that username to view the user detail page.
j. Choose Confirm user to finalize the account creation process.
k. After confirming the new user using either the /verify.html page or the Cognito console, visit /signin.html and log in using the email address and password you entered during the registration step.
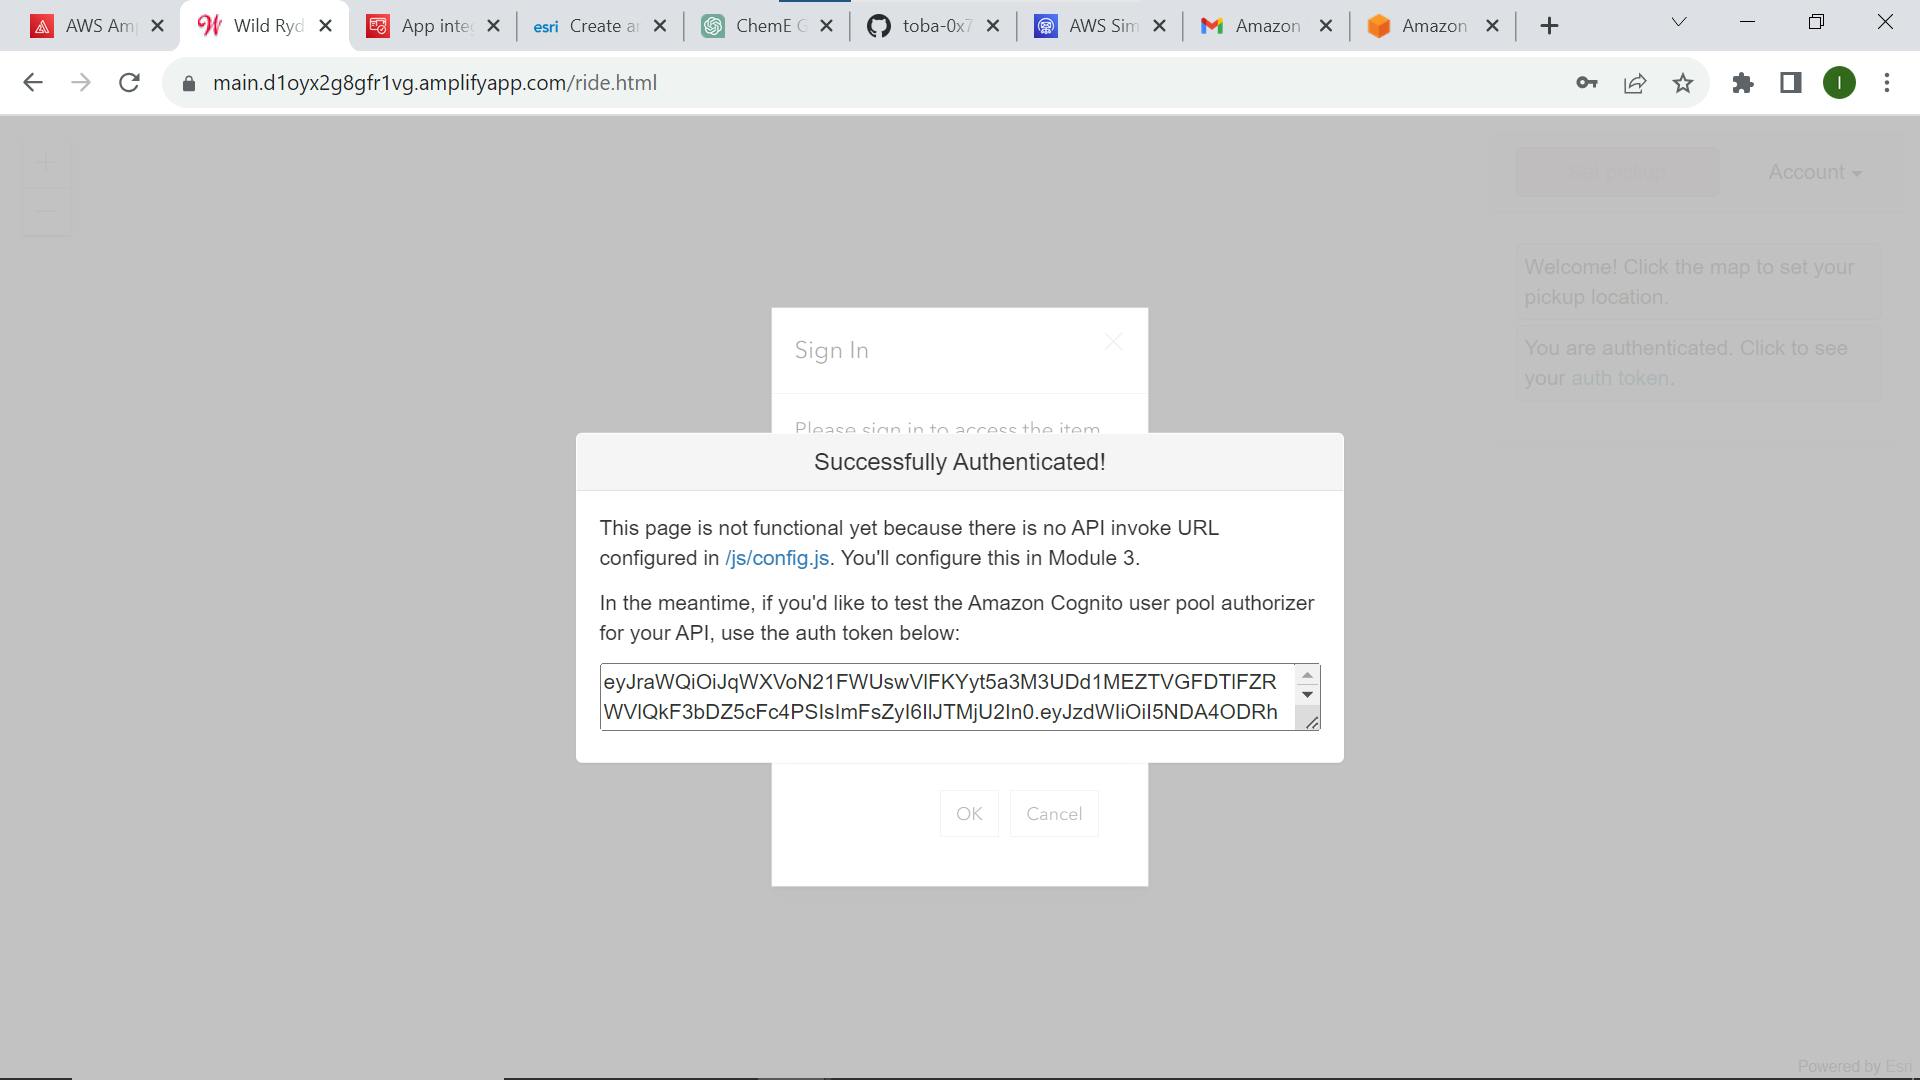
l. If successful you should be redirected to /ride.html. You should see a notification that the API is not configured.
Serverless Service Backend
In this module, we will use AWS Lambda and Amazon DynamoDB to build a backend process for handling requests for your web application. The browser application that we deployed in the first module allows users to request that a unicorn be sent to a location of their choice. To fulfil those requests, the JavaScript running in the browser will need to invoke a service running in the cloud.
Implementation
Create an Amazon DynamoDB Table
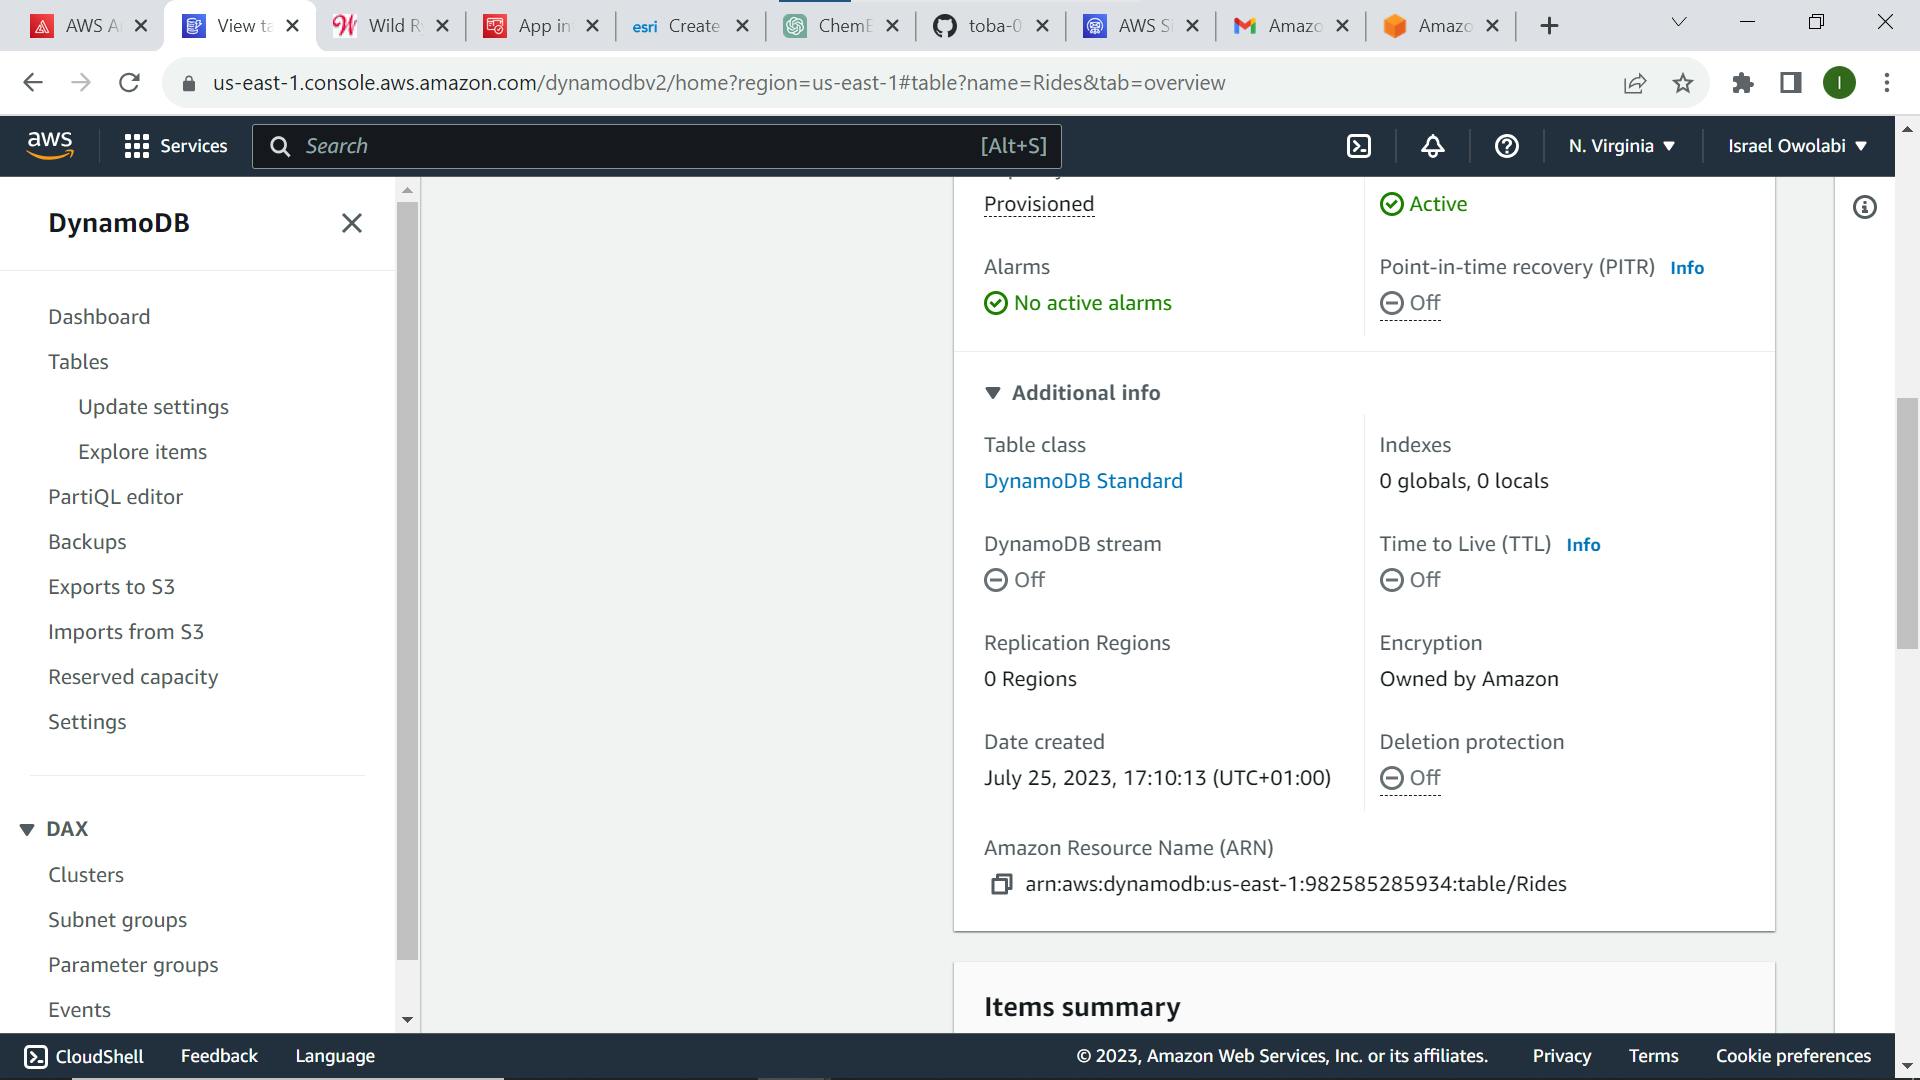
Use the Amazon DynamoDB console to create a new DynamoDB table. Call your table Rides and give it a partition key called RideId with type String. The table name and partition key are case-sensitive. Make sure you use the exact IDs provided. Use the defaults for all other settings.
After you've created the table, note the ARN for use in the next step.
a. From the AWS Management Console, choose Services then select DynamoDB under Databases.
b. Choose Create table.
c. Enter Rides for the Table name. This field is case sensitive.
d. Enter RideId for the Partition key and select String for the key type. This field is case sensitive.
e. Check the Use default settings box and choose Create. Navigate to the Tables page in the DynamoDB console and wait for your table creation to complete. Once it is completed, select your table name.
f. Scroll to the bottom of the Overview section of your new table and choose Additional info. Note the ARN. You will use this in the next section.
Creating an IAM Role for Our Lambda Function
Every Lambda function has an IAM role associated with it. This role defines what other AWS services the function is allowed to interact with. For this workshop, we'll need to create an IAM role that grants our Lambda function permission to write logs to Amazon CloudWatch Logs and access to write items to our DynamoDB table.
Use the IAM console to create a new role. Name it WildRydesLambda and select AWS Lambda for the role type. You'll need to attach policies that grant your function permissions to write to Amazon CloudWatch Logs and put items to your DynamoDB table.
Attach the managed policy called AWSLambdaBasicExecutionRole to this role to grant the necessary CloudWatch Logs permissions. Also, create a custom inline policy for your role that allows the ddb:PutItem action for the table you created in the previous section.
a. From the AWS Management Console, click on Services and then select IAM in the Security, Identity & Compliance section.
b. Select Roles in the left navigation pane and then choose Create Role.
c. Underneath Trusted Entity Type, select AWS service. For Use case, select Lambda, then choose Next.
Note: Selecting a role type automatically creates a trust policy for your role that allows AWS services to assume this role on your behalf. If you were creating this role using the CLI, AWS CloudFormation or another mechanism, you would specify a trust policy directly.\
d. Begin typing AWSLambdaBasicExecutionRole in the Filter text box and check the box next to that role.
e. Choose Next Step.
f. Enter WildRydesLambda for the Role Name. Keep other parameters as default.
g. Choose Create Role.
h. Type WildRydesLambda into the filter box on the Roles page and choose the role you just created.
i. On the Permissions tab, on the left under Add permissions, choose Create Inline Policy.
j. Select Choose a service.
k. Begin typing DynamoDB into the search box labeled Find a service and select DynamoDB when it appears..
l. Choose Select actions.
m. Begin typing PutItem into the search box labeled Filter actions and check the box next to PutItem when it appears.
n. Select the Resources section.
o. With the Specific option selected, choose the Add ARN link in the table section.
p. Paste the ARN of the table you created in the previous section in the Specify ARN for table field, and choose Add.
q. Choose Review Policy.
r. Enter DynamoDBWriteAccess for the policy name and choose Create policy.
Create a Lambda Function for Handling Requests
AWS Lambda will run our code in response to events such as an HTTP request. In this step, we'll build the core function that will process API requests from the web application to dispatch a unicorn. In the next module, we'll use Amazon API Gateway to create a RESTful API that will expose an HTTP endpoint that can be invoked from our users' browsers. We'll then connect the Lambda function we create in this step to that API to create a fully functional backend for our web application.
Use the AWS Lambda console to create a new Lambda function called RequestUnicorn that will process the API requests. Use the provided requestUnicorn.js example implementation for your function code. Just copy and paste from that file into the AWS Lambda console's editor.
Make sure to configure your function to use the WildRydesLambda IAM role you created in the previous section.
a. Choose Services then select Lambda in the Compute section.
b. Click Create function.
c. Keep the default Author from scratch card selected.
d. Enter RequestUnicorn in the Name field.
e. Select Node.js 16.x for the Runtime (newer versions of Node.js will not work in this tutorial)
f. Ensure Use an existing role is selected from the Change default execution role dropdown.
g. Select WildRydesLambda from the Existing Role dropdown.
h. Click on Create function.
i. Scroll down to the Code source section and replace the existing code in the index.js code editor with the contents of requestUnicorn.js.
j. Choose Deploy.
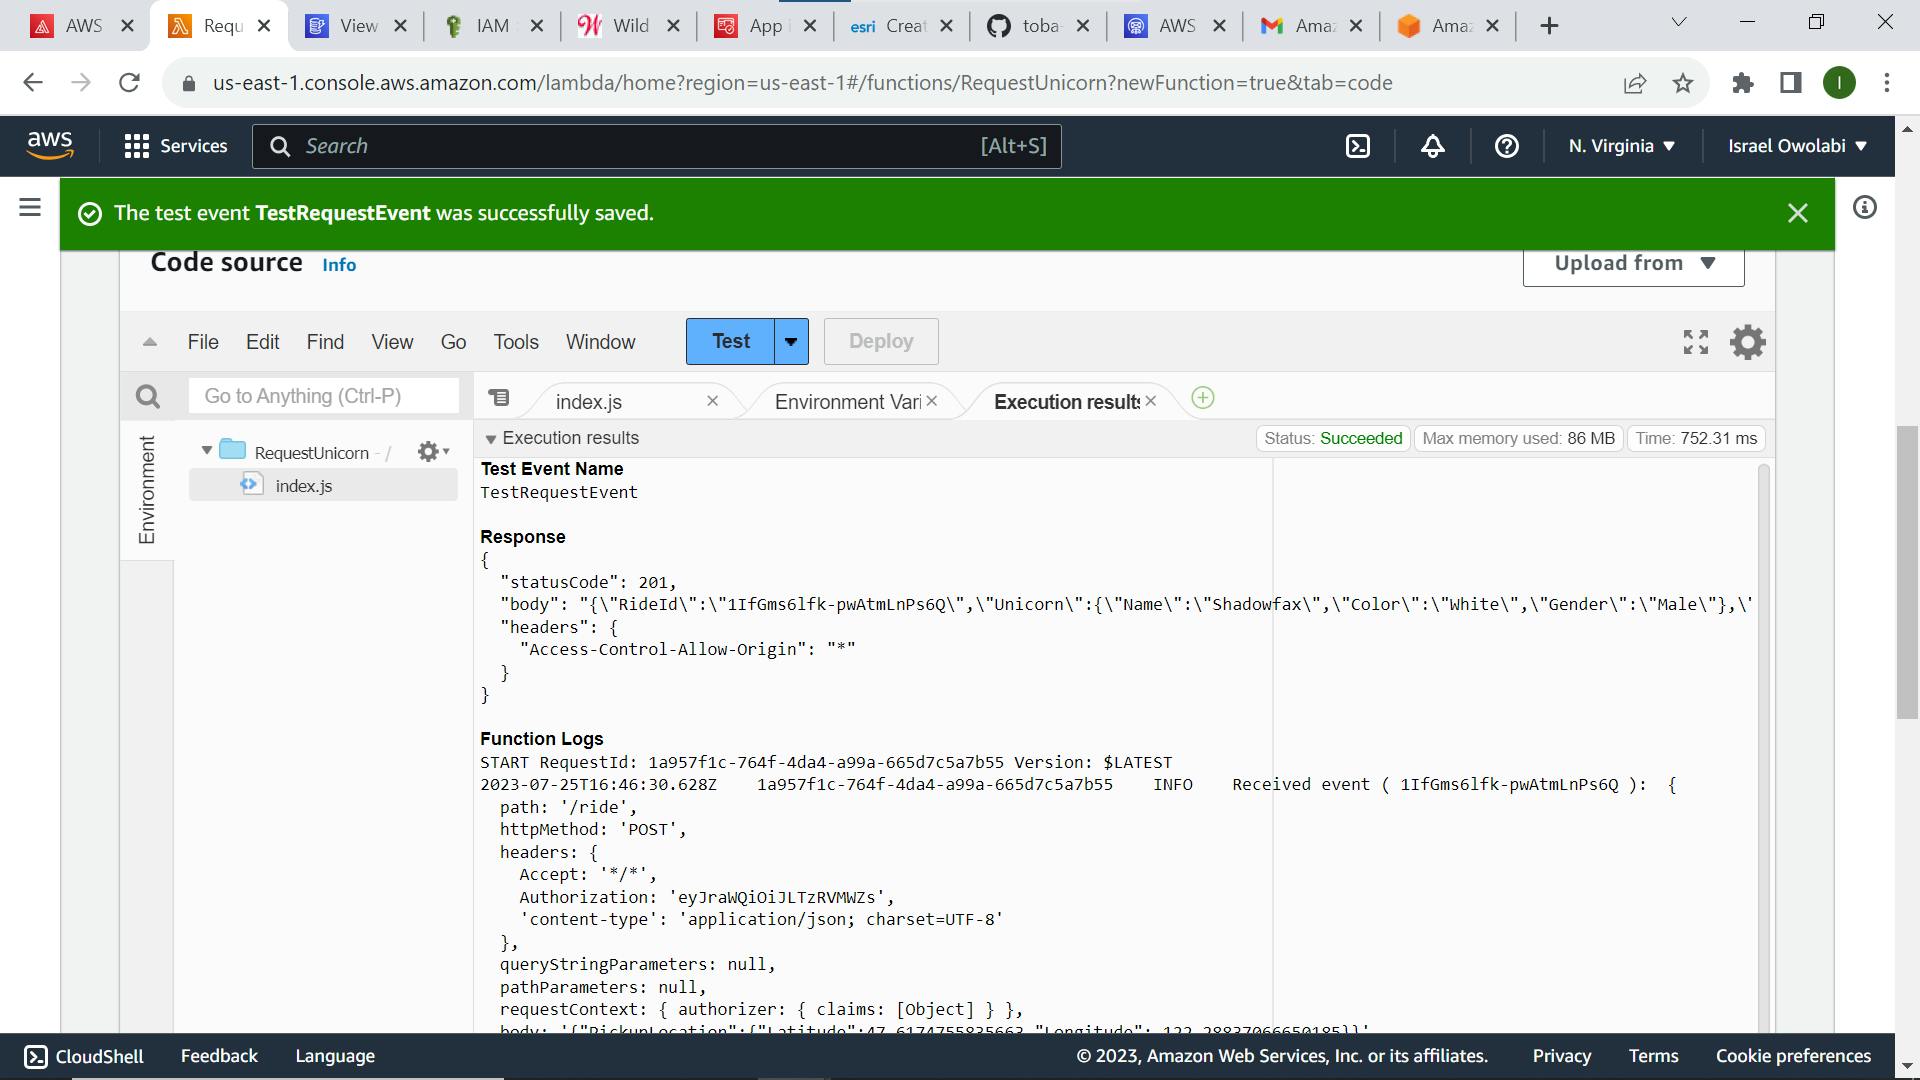
Validate Your Implementation
For this module, we will test the function that we built using the AWS Lambda console. In the next module, we will add a REST API with API Gateway so we can invoke our function from the browser-based application that we deployed in the first module.
a. From the main edit screen for your function, select Test and choose Configure test event from the dropdown.
b. Keep Create new event selected.
c. Enter TestRequestEvent in the Event name field
d. Copy and paste the following test event into the editor:

{
    "path": "/ride",
    "httpMethod": "POST",
    "headers": {
        "Accept": "*/*",
        "Authorization": "eyJraWQiOiJLTzRVMWZs",
        "content-type": "application/json; charset=UTF-8"
    },
    "queryStringParameters": null,
    "pathParameters": null,
    "requestContext": {
        "authorizer": {
            "claims": {
                "cognito:username": "the_username"
            }
        }
    },
    "body": "{\"PickupLocation\":{\"Latitude\":47.6174755835663,\"Longitude\":-122.28837066650185}}"
}

e. Choose Save.
f. On the main function edit screen click Test with TestRequestEvent selected in the dropdown.
g. Scroll to the top of the page and expand the Details section of the Execution result section.
h. Verify that the execution succeeded and that the function result looks like the following:

{
    "statusCode": 201,
    "body": "{\"RideId\":\"SvLnijIAtg6inAFUBRT+Fg==\",\"Unicorn\":{\"Name\":\"Rocinante\",\"Color\":\"Yellow\",\"Gender\":\"Female\"},\"Eta\":\"30 seconds\"}",
    "headers": {
        "Access-Control-Allow-Origin": "*"
    }
}
Deploy a RESTful API
In this module, we will use Amazon API Gateway to expose the Lambda function we built in the previous module as a RESTful API. This API will be accessible on the public Internet. It will be secured using the Amazon Cognito user pool we created in the previous module. Using this configuration, we will then turn your statically hosted website into a dynamic web application by adding client-side JavaScript that makes AJAX calls to the exposed APIs.
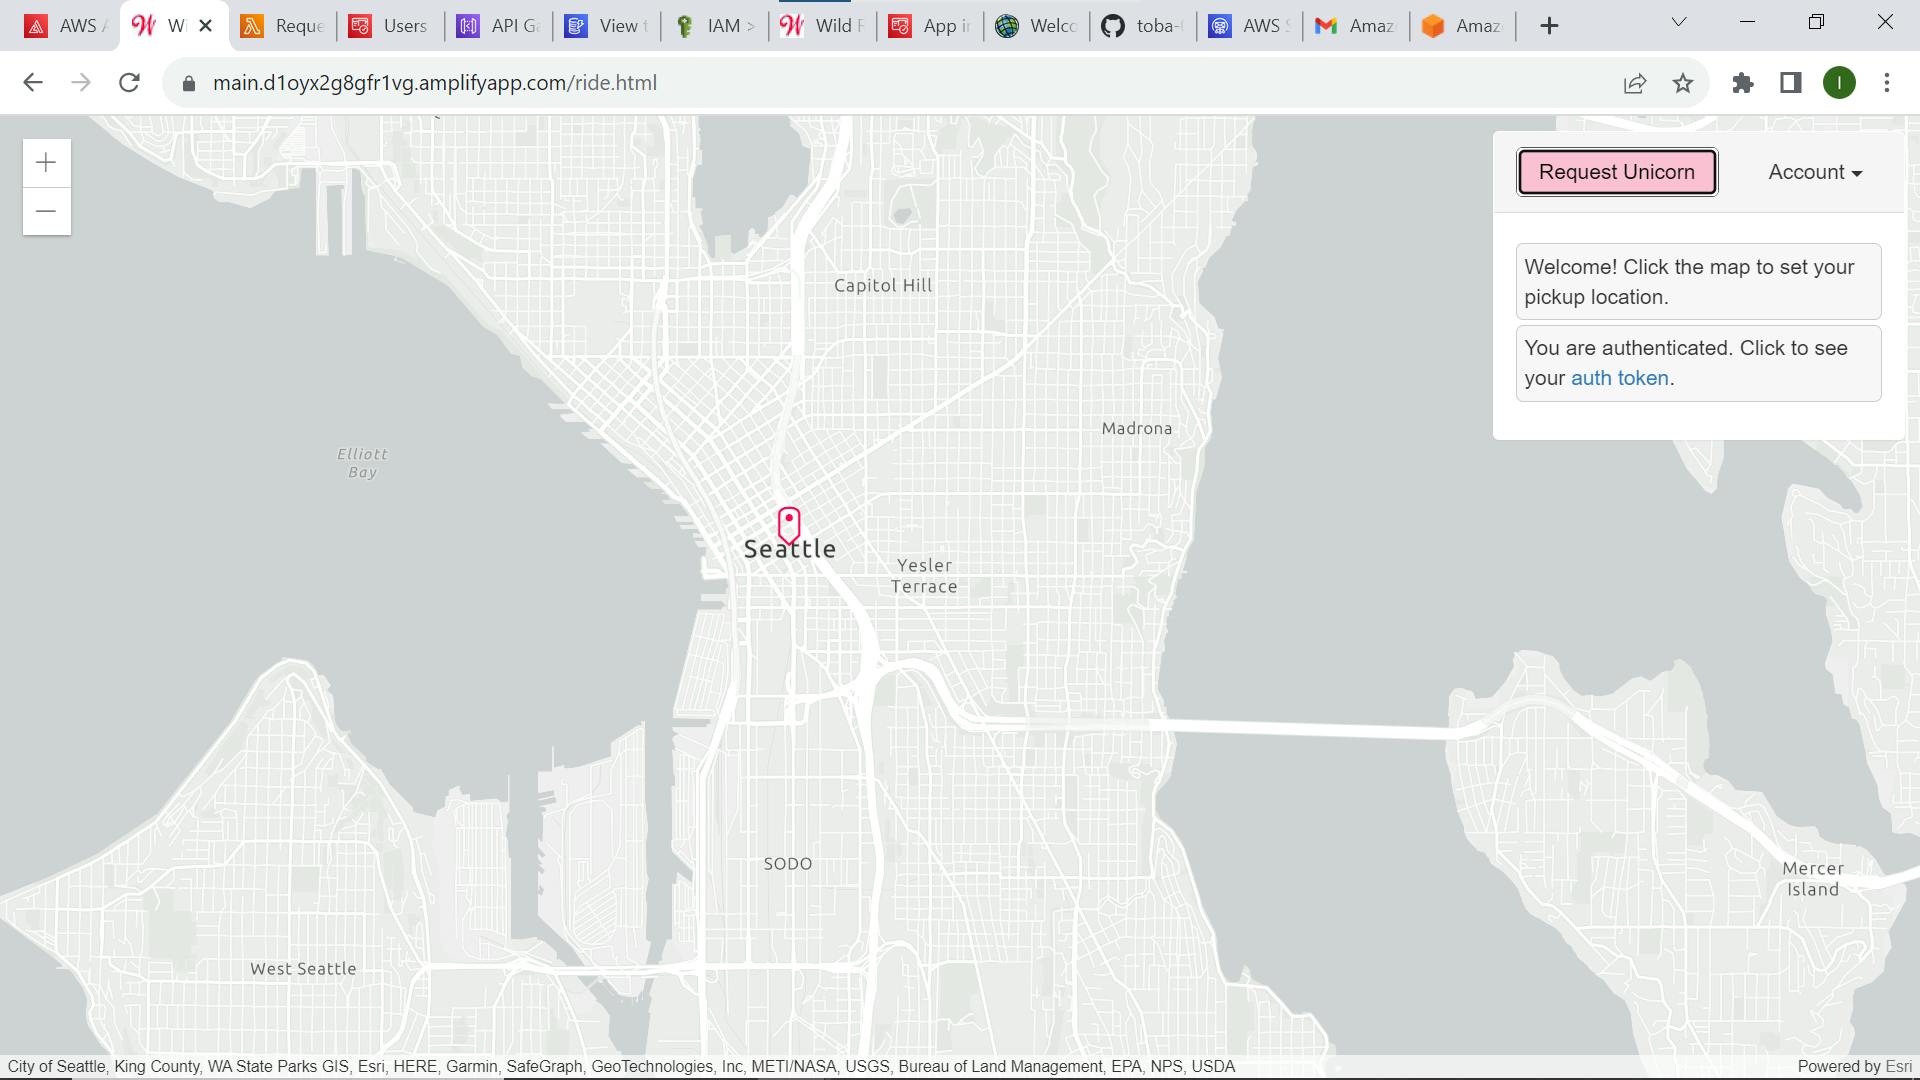
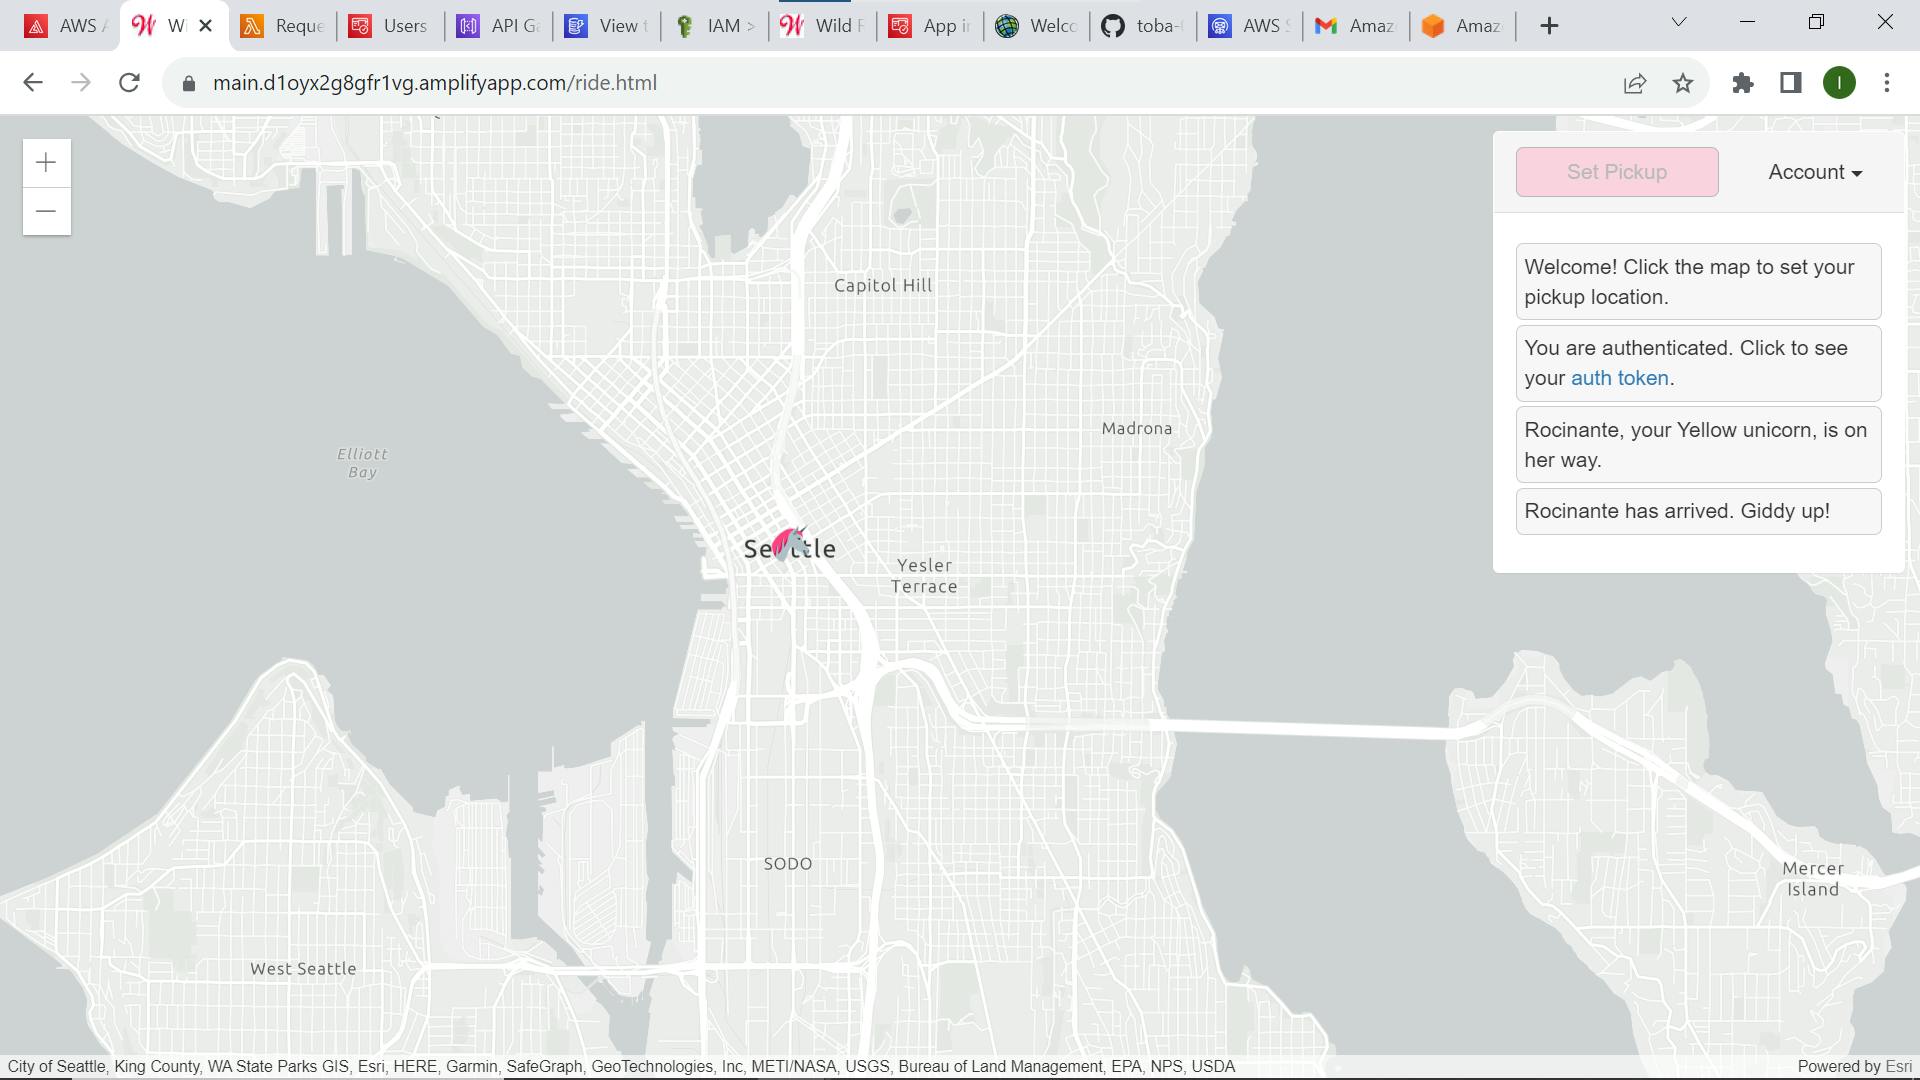
The static website we deployed in the first module already has a page configured to interact with the API we will build in this module. The page at /ride.html has a simple map-based interface for requesting a unicorn ride. After authenticating using the /signin.html page, our users will be able to select their pickup location by clicking a point on the map and then requesting a ride by choosing the "Request Unicorn" button in the upper right corner.
This module will focus on the steps required to build the cloud components of the API, but if you're interested in how the browser code works that call this API, you can inspect the ride.js file of the website. In this case, the application uses jQuery's ajax() method to make the remote request.
Implementation
Create a New REST API
a. In the AWS Management Console, click Services then select API Gateway under Application Services.
b. Choose Create API. Underneath the Create new API section, make sure New API is selected.
c. Select Build under REST API and enter WildRydes for the API Name.
d. Choose Edge optimized in the Endpoint Type dropdown. Note: Edge optimized are best for public services being accessed from the Internet. Regional endpoints are typically used for APIs that are accessed primarily from within the same AWS Region.
e. Choose Create API
Create a new resource and method
Create a new resource called /ride within your API. Then create a POST method for that resource and configure it to use a Lambda proxy integration backed by the RequestUnicorn function you created in the first step of this module.
a. In the left nav, click on Resources under your WildRydes API.
b. From the Actions dropdown select Create Resource.
c. Enter ride as the Resource Name.
d. Ensure the Resource Path is set to ride.
e. Select Enable API Gateway CORS for the resource.
f. Click Create Resource.
g. With the newly created /ride resource selected, from the Action dropdown select Create Method.
h. Select POST from the new dropdown that appears, then click the checkmark.
i. Select Lambda Function for the integration type.
j. Check the box for Use Lambda Proxy integration.
k. Select the Region you are using for Lambda Region.
l. Enter the name of the function you created in the previous module, RequestUnicorn, for Lambda Function.
m. Choose Save. Please note, if you get an error that your function does not exist, check that the region you selected matches the one you used in the previous module.
n. When prompted to give Amazon API Gateway permission to invoke your function, choose OK.
o. Choose on the Method Request card.
p. Choose the pencil icon next to Authorization.
q. Create Authorizer using https://docs.aws.amazon.com/apigateway/latest/developerguide/apigateway-enable-cognito-user-pool.html, Select the WildRydes Cognito user pool authorizer from the drop-down list, and click the checkmark icon.

Deploying Our API
From the Amazon API Gateway console, choose Actions, Deploy API. You'll be prompted to create a new stage. You can use prod for the stage name.
a. In the Actions drop-down list select Deploy API.
b. Select [New Stage] in the Deployment stage drop-down list.
c. Enter prod for the Stage Name.
d. Choose Deploy.
e. Note the Invoke URL. You will use it in the next section.

Update the website config
Update the /js/config.js file in your website deployment to include the invoke URL of the stage you just created. You should copy the invoke URL directly from the top of the stage editor page on the Amazon API Gateway console and paste it into the _config.api.invokeUrl key of your sites /js/config.js file. Make sure when you update the config file it still contains the updates you made in the previous module for your Cognito user pool.
a. Open the config.js file in a text editor.
b. Update the invokeUrl setting under the api key in the config.js file. Set the value to the Invoke URL for the deployment stage your created in the previous section.
An example of a complete config.js file is included below. Note, the actual values in your file will be different.

window._config = {
    cognito: {
        userPoolId: 'us-west-2_uXboG5pAb', // e.g. us-east-2_uXboG5pAb
        userPoolClientId: '25ddkmj4v6hfsfvruhpfi7n4hv', // e.g. 25ddkmj4v6hfsfvruhpfi7n4hv
        region: 'us-west-2' // e.g. us-east-2
    },
    api: {
        invokeUrl: 'https://rc7nyt4tql.execute-api.us-west-2.amazonaws.com/prod' // e.g. https://rc7nyt4tql.execute-api.us-west-2.amazonaws.com/prod,
    }
};

c. Save the modified file and push it to your Git repository to have it automatically deploy to Amplify Console.

git add .
git commit -m "new_configuration"
git push
Validating our implementation
Note: You may see a delay between updating the config.js file in your S3 bucket and when the updated content is visible in your browser. You should also ensure that you clear your browser cache before executing the following steps.
a. Update the ArcGIS JS version from 4.3 to 4.6 (newer versions will not work in this tutorial) in the ride.html file as:
<script src="https://js.arcgis.com/4.6/"></script>
<link rel="stylesheet" href="https://js.arcgis.com/4.6/esri/css/main.css">
An example of a complete ride.html file is included below. Note, some values in your file may be different.
<div id="noApiMessage" class="configMessage" style="display: none;">
<div class="backdrop"></div>
<div class="panel panel-default">
<div class="panel-heading">
<h3 class="panel-title">Successfully Authenticated!</h3>
</div>
<div class="panel-body">
<p>This page is not functional yet because there is no API invoke URL configured in <a href="/js/config.js">/js/config.js</a>. You'll configure this in Module 3.</p>
<p>In the meantime, if you'd like to test the Amazon Cognito user pool authorizer for your API, use the auth token below:</p>
<textarea class="authToken"></textarea>
</div>
</div>
</div>
<div id="noCognitoMessage" class="configMessage" style="display: none;">
<div class="backdrop"></div>
<div class="panel panel-default">
<div class="panel-heading">
<h3 class="panel-title">No Cognito User Pool Configured</h3>
</div>
<div class="panel-body">
<p>There is no user pool configured in <a href="/js/config.js">/js/config.js</a>. You'll configure this in Module 2 of the workshop.</p>
</div>
</div>
</div>
<div id="main">
<div id="map">
</div>
</div>
<div id="authTokenModal" class="modal fade" tabindex="-1" role="dialog" aria-labelledby="authToken">
<div class="modal-dialog" role="document">
<div class="modal-content">
<div class="modal-header">
<button type="button" class="close" data-dismiss="modal" aria-label="Close"><span aria-hidden="true">×</span></button>
<h4 class="modal-title" id="myModalLabel">Your Auth Token</h4>
</div>
<div class="modal-body">
<textarea class="authToken"></textarea>
</div>
<div class="modal-footer">
<button type="button" class="btn btn-default" data-dismiss="modal">Close</button>
</div>
</div>
</div>
</div>
<script src="js/vendor/jquery-3.1.0.js"></script>
<script src="js/vendor/bootstrap.min.js"></script>
<script src="js/vendor/aws-cognito-sdk.min.js"></script>
<script src="js/vendor/amazon-cognito-identity.min.js"></script>
<script src="https://js.arcgis.com/4.6/"></script>
<script src="js/config.js"></script>
<script src="js/cognito-auth.js"></script>
<script src="js/esri-map.js"></script>
<script src="js/ride.js"></script>
</body>
</html>
b. Save the modified file and push it to your Git repository to have it automatically deploy to Amplify Console.
c. Visit /ride.html under your website domain.
d. If you are redirected to the ArcGIS sign-in page, sign in with the user credentials you created previously in the Introduction section as a prerequisite of this tutorial.
e. After the map has loaded, click anywhere on the map to set a pickup location.
f. Choose Request Unicorn. You should see a notification in the right sidebar that a unicorn is on its way and then see a unicorn icon fly to your pickup location.
Resource cleanup
In this module, we will go through the steps to terminate all the resources we created throughout this tutorial. We will terminate our AWS Amplify app, an Amazon Cognito User Pool, an AWS Lambda function, an IAM role, a DynamoDB table, a REST API, and a CloudWatch Log. It is a best practice to delete resources you are no longer using to avoid unwanted charges.
Implementation
Deleting our Amplify App
a. In the AWS Management Console choose Services then select AWS Amplify under Mobile.
b. Select the app you created in module 1.
c. On the app landing page, choose ‘Actions > Delete app’. Enter ‘delete’ when prompted to confirm, then choose confirm.
Deleting our Amazon Cognito user pool
If you used the provided AWS CloudFormation template to complete module 2, simply delete the stack using the AWS CloudFormation Console. Otherwise, delete the Amazon Cognito user pool you created in module 2.
a. From the AWS Console click Services then select Cognito under Mobile Services.
b. Choose Manage your User Pools.
c. Select the WildRydes user pool you created in module 2.
d. Choose Delete Pool in the upper right corner of the page.
e. Type delete and choose Delete Pool when prompted to confirm.
Deleting our serverless backend
Delete the AWS Lambda function, IAM role and Amazon DynamoDB table you created in module 3.
Lambda Function
a. In the AWS Management Console, click Services then select Lambda under Compute.
b. Select the RequestUnicorn function you created in module 3.
c. From the Actions drop-down, choose Delete function.
d. Enter delete and choose Delete pool when prompted to confirm.

IAM Role
a. In the AWS Management Console, click Services then select IAM under Security, Identity & Compliance.
b. Select Roles from the left navigation pane.
c. Enter WildRydesLambda into the filter box.
d. Select the role you created in Module 3.
e. Select the Role and choose Delete. Confirm the role name that needs to be deleted by entering WildRydesLambda. Choose Delete role.
f. Choose Yes, Delete when prompted to confirm.

DynamoDB Table
a. In the AWS Management Console, click Services then select DynamoDB under Databases
b. Choose Tables in the navigation menu.
c. Choose the Rides table you created in module 3.
d. Choose Delete at the top right.
e. Leave the checkbox to Delete all CloudWatch alarms for this table selected, enter delete, and choose Delete.
Deleting our REST API
Delete the REST API created in module 4. There is a Delete API option in the Actions drop-down when you select your API in the Amazon API Gateway Console.
a. In the AWS Management Console, click Services then select API Gateway under Application Services.
b. Select the API you created in module 4.
c. Expand the Actions drop-down and choose Delete API.
d. Enter the name of your API when prompted and choose Delete API.
Deleting our CloudWatch Log
AWS Lambda automatically creates a new log group per function in Amazon CloudWatch Logs and writes logs to it when your function is invoked. You should delete the log group for the RequestUnicorn function. Also, if you launched any CloudFormation stacks, there may be log groups associated with custom resources in those stacks that you should delete.
a. From the AWS Console click Services then select CloudWatch under Management Tools.
b. Choose Logs in the navigation menu.
c. Select the /aws/lambda/RequestUnicorn log group. If you have many log groups in your account, you can type /aws/lambda/RequestUnicorn into the Filter text box to easily locate the log group.
d. Choose Delete log group from the Actions drop-down.
e. Choose Yes, Delete when prompted to confirm.
f. If you launched any CloudFormation templates to complete a module, repeat steps 3-5 for any log groups which begin with /aws/lambda/wildrydes-webapp.